
Reddy, S. (2016) ‘Lighting Up “La La Land” | The Perfect Movie To Inspire You For 2017’
Throughout this week we are focusing again on visual skills, specifically lighting. Lighting is something I am really interesting in learning and improving on as a creator. This week I will be focusing and thinking about different problems I have had in the past to do with lighting, as well as thinks about different solutions to solve these problems and improve as a creator. I will also be producing a practical task to back up my knowledge and try to understand different problems I may face and solutions to help resolve them.
Problem:
- when using natural light, two shots may not match up, and therefore will effect the continuity of the shot at hand
Solution:
- checking the weather forecast and only shooting between certain hours.
- using artificial light to increase the control that you have over the lighting itself
- if there is no way to improve the lighting on the day you can use colour correction when editing. This can be less accurate than using artificial lighting as on the day you can review your shots and go back to them and create the most accurate lighting possible.
Problem:
- making your lighting look realistic: Sometimes it is hard to make your lighting look realistic when shooting with artificial light.
Solution:
- white balance: you can use white balance to improve the temperature of your shots. If your shots look too cool or warm, it can make your shots look less realistic and can pull your audience out of the scene.
- fill light: A fill light can help to illuminate your scene as well as filling in any dark shadows that reduce how realistic the scene looks
- filters: can help make your lighting look even more realistic. You can also use this to change different elements of your scene, and change the overall aesthetic completely
Problem:
- scene is too dark.
Solution:
- use artificial light when shooting your scene to improve the overall lighting.
- colour correction to brighten up your scene. This can work but it can reduce the overall look and quality of the shot.
Problem:
- The overall image looks very flat and unrealistic. This intern making the overall shot seem uninteresting and not very aesthetically pleasing the audience.
Solution:
- 3 point lighting setup. Using three point lighting can help you to make your character or thing you are shooting stand out even more, which can make your character seem more 3. It can also help to accentuate and bring out more detail on what you are shooting. It helps to create the illusion of reality for the camera and for the audience.
Lighting Techniques:
Lighting Aesthetics:
the lighting aesthetic is part of the visual narrative design. It is of the responsibility of the DOP – director of photography or the lighting director to ‘paint with light’. This is an extremely important part of the overall production, as it can change the whole mood and aesthetic of the scene itself. There are many other uses to light that just illuminating the scene. Lighting can give meaning and help evoke emotion out of the scene.
Uses of Light:
- illumination
- mood
- guide our attention
- texture and shape
two types of shadows:
- Attached shadow:
- Cast shadow: The shadow that is being cast by the character.
The four major features of filmic lighting:
- quality:
- hard: Clearly defined shadows with light and dark areas
- Soft: diffused illumination. There are often soft shadows, indirect or indistinct lighting
- harsh: Extreme difference between light and dark areas. Often extremely high contrast images. Harsh light is less commonly used, but can be used to try and make the character stand out as being stark or even unattractive.
2. Direction:
- frontal light
- side light
- back light
- under light
- top light
3. Source:
- Artificial- Includes things like bulbs, glow sticks, diodes and other man made light sources.
- Natural- includes things such as sunlight, moonlight, fire and other types of natural lighting.
4. Colour
- Apparent colour: colour as observed by human eyes
- colour temperature: colour based on equivalent temperature against a black background: represented in kelvins
Common colour temperatures:
- Tungsten- 3600 degrees kelvin
- daylight- 5600 degrees kelvin
- fluorescent- 5400 degrees kelvin
High-key, Low-key and High-contrast lighting:
- High-Key Lighting:
High-key lighting indicates scene that is brightly lit with few shadows.
- Low-Key Lighting:
On the opposite scale, low-key lighting is lighting that is often greyer and darker. The key light often is less bright and doesn’t dominate the scene. Lots of shadows are also usually present. This type of lighting could be used really effectively to create a eerie and unstable atmosphere.
- High-Contrast Lighting:
High-contrast lighting is a term used to describe when there is a strong contrast between the light and shadow, with a low amount of in between grey scale.
The Importance of lighting:
The first practical task this week was extremely helpful and informative. This week, we were challenged to create the following:
Using Artificial Light:
- Key Light
- Fill Light
- Back Light
- All three together
Natural Light:
- Key Light
- Fill Light
- Back Light
- All three together
Whilst doing this task I did encounter some problems. I will be discussing and evaluating these problems, and talking about the solutions that my group and I came up with.
I am interested to find out the differences in the two sources of light (natural and artificial) and which one will be the easiest to use when trying to create and use them to create three different types of light. (Key, fill and back).
Artificial Light Source:
Firstly, our group decided to try to create each type of light in the TV studio using Artificial light. It was a really interesting and exciting experience to have the opportunity to use professional artificial lights, and gain experience of professional equipment that I would be using in the industry.
Artificial Fill Light:

The first type of light that my group tried to recreate was a fill light using artificial light. A fill light is often used to fill in the shadows created by a key light and so, to show the fill light, we used a key light on the left hand side of the actors faces. This created a harsh shadow, and therefore we used a Fill light to reduce the harsh, dark shadow cast on the right hand side of the actors face. Looking back at the shot now, overall I ma happy with how it turned out. I think that I could have reduced the intensity of the harsh fill light slightly to help to create more dimension to the actors face. The fill light is supposed to help to soften the harsh shadows that the fill light creates, and overall this task has been achieved.
Artificial Key Light:
The next light that we had to create was a key light using an artificial source. We sued a key light a decided to make the main light hit the side of the subjects face, as this is where we wanted the main light to be. Because there is no key light, you can see the harsh, defined shadow created by the key light. Overall this shot was extremely successful to show a key light from a source of artificial light.
Artificial Back Light:

In this shot our group was trying to show a back light from an artificial light source. To create this shot, we left on the general LED lights from around the TV studio for general lighting, and then used a back light behind the actor. The backlight helped to create an outline of light around the outside of the actor, this could be really effective if we were filming a scene featuring a ghost or maybe a spirit. You could really experiment with the back light to create a really dramatic, ghost like effect.
Artificial all three lights:

The final shot we had to create using artificial light, was using a key light, fill light and back light.
Problem:
We decided to put a diffuser over the back light to reduce the harsh outline it previously gave the actor. Doing this did help to define the actors head how I wanted, but not the actors body.
Solution:
If I was to complete this task again, I would make sure that the back light was directed towards the whole of the actors back that was in the shot, rather than just nearer the top. Another solution could be to not use the diffuser, and to move the light further back to reduce the harsh light that previously surrounded the actor.
Natural Light Source:
Next, our group decided to try to create each type of light using natural light. I personally found this task a lot harder than using the artificial light source. This is because you can control where the artificial light source is coming from, whereas you have restrictions when it comes to using natural light.
Natural Key light :

Firstly, out group tried to show a key light using natural lighting. We sat our subject so he was facing directly towards the sun and then took a photo. This shot show a key light, as the natural light source (the sun) is the main source of light shining onto the subject. I think that adding a back light would help to define the actor move, although this shot does show what we aimed for it to.
Natural Back Light:

To create a natural back light, we stood our actor so his back was facing the natural light of the sun.
Problem:
Because of the weather conditions we had to take shots in, the image came out extremely dark. We tried our best in the environment we had to create the most powerful backlight possible.
Solution:
Although the backlight was not as strong as we would have hoped, to try to solve the problem we made sure that the actor was facing completely behind the most powerful area of sun, to make sure that we were using the most amount of light possible.
Overall, we did achieve the objective, as we used a natural light to crete a back light. To create a better over image, we could have use artificial light to help to illuminate the actors body, but this is not relevant to the task.
Natural fill light:

In this shot we tried to create something really different to represent natural fill lighting . We tried to use two people hugging, with their sides facing towards the natural light.
Problem:
At this point in the day, the natural lighting was rather strong, and so the light did not focus and stay just of the side of the two actors.
Solution: The way we did try to sort this was to ensure that the area we were situated in was reasonably closed off, and so the light couldn’t hit the actors from all 360 degrees at the same strength. This is why we made sure to be near the college building, to clock out some of the back light that would have been created by the strength one the natural light.
Overall, in some ways this shot did work out, as we did manages to capture the natural light hitting the actors on the right hand side, although the natural light isn’t souly creating just a fill light.
Natural all 3 lights:

The final shot that we had to take was by using all three different types of light. We found it and to create this shot using only natural lighting. The problem was that the sunlight was reasonably low when we were shooting. This meant that there was a lack of a powerful light source. If I was to complete this task again, I would definitely make sure to use an artificial key light, to make sure that my actor stands out.
Experimentation:

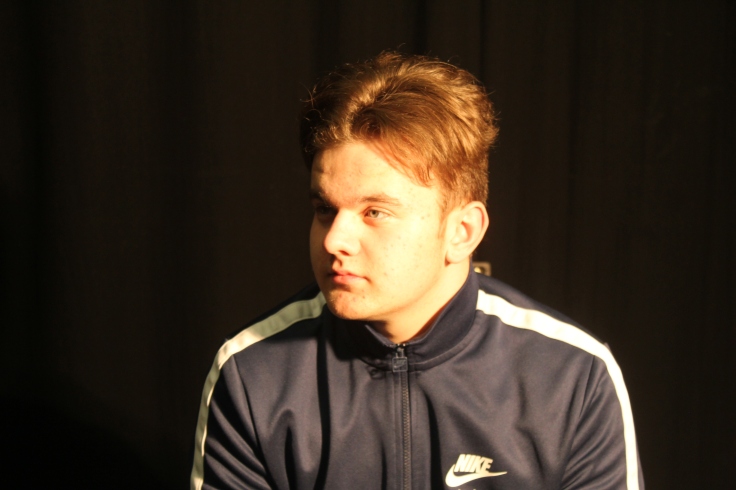
The final shot I wanted to evaluate was the one above. My group decided to try experimenting by using both natural and artificial light it one shot. We used the natural back light from a variety of vending machines behind the actor. This was a really effective use of lighting as the light was soft, but helped to light up the back of the actor, giving him shape and helping him to stand out from the background of the shot. We used an artificial light for the key light, directing it onto the bottom right of the actors face. We used a natural fill light, as we decided to sue the light coming in through the window.
Lighting in Film Analysis:
In this task I will be picking two different shots from Films that I have noticed have really effective lighting. I will be describing what types of light has been used in the scene. I will also be analysing what effect director of photography wanted to achieve with chosen lighting and also what type of effects and colour manipulation was used and why. I will also be talking about why I personally find the lighting so aesthetic pleasing for me, and why I think it will be pleasing for a wider audience.
Reddy, S. (2016) ‘Lighting Up “La La Land” | The Perfect Movie To Inspire You For 2017’
The first shot I have found is this shot from the film ‘La La Land’. La La land is a film I saw in the last few days. The visuals, from lighting design to camera movement and screen direction, was truly incredible. The film has really impacted me as a person, with its incredibly crafted storyline, to the camera work, sound design and lighting design. I chose to use this shot in particular simply because it looks so natural and so simple and yet so well crafted.Describe what types of light has been used in this scene?
There is a key lighting going from the right of the shot onto Emma Stone. There is also a fill light present that is coming from the viewers perspective onto the rest of the scene. I also think that there may be a weak top light being used to help to outline Emma stone.
- what effect director of photography wanted to achieve with chosen lighting?
as you can see by the beginning of this trailer, in this scene, Emma stone is walking home, but stumbles across the restaurant that Ryan Gosling is playing at. The shot I have chosen comes just before she hears the beautiful piano playing coming from the restaurant. I think that Linus Sandgren used reasonably simple and yet effect lighting to try and achieve a ‘calm before the storm’ affect. By this I mean, at this point in her life, Mia ( played by Emma Stone ) is in a low. She is not in the job she wants, she has no romance and she is not fulfilling her dreams. I think that the lighting helps to create a calm atmosphere, showing the characters life at this moment in time. It is clear to the audience that, for the story to develop, that something must be in the near future to change this path. This is why i believe Sandgren wanted to create this calm and low lighting, before Mia’s life changes from being in this state, to something extremely new and exciting.I also think that Sandgrens aim was to keep Mia as the main focus of the scene. Making the key light light up the front of the character helps the audience to focus on her, and understand that we should aim our focus on her, in front of anyone else.
- what type of effects and colour manipulation was used and why?
I definitely think that the temperature has been reduced in this scene during the editing process. This is because all of the colours in the scene seem very cool, and there are lots of blue tones present. Although blue filters could have been used, i think that this would not have been enough to create this cool atmosphere throughout the shot.

- Describe what types of light has been used in this scene?
This shot is the shot The I have decided to create for my practical task. A key light is being used here, most likely with barn doors to create the the extremely affective slit across Morticias eyes. A back light is being used to bring Morticia out from the background of the shot, seeing as the background and her costume are reasonably similar. A fill light is also being used to help to reduce some of the harsh shadow being created by the key light around the eyes. Although, the fill light would he reasonably weak, as the shadows created by the key light have helped to really define and shape her face, giving her very defined cheek and jaw bones.
- what effect director of photography wanted to achieve with chosen lighting?
I think that the director of photography wanted to draw attention to Morticias eyes in particular. Having the very noticeable strip of light across the eyes helps to draw attention straight to Morticia, telling and explaining to the audience that she is an very important character that should be focused on and remembered.
I believe that the director of photography was wanted to really bring out the more alluring and mysterious side of Morticia Addams as a character. Keeping the rest if her face defined and sharp helps to show the audience that Morticia can be a very harshand sharp character, with a large amount of power and stance. The soft dispersion of the strip of light surrounding the eyes helps to display to the audience the Morticia is genuine, and has a strong heart. Morticia Addams is often known for having an extremely alluring and mysterious personality, and i really think that this is the effect and mood the director of photography wanted to create here.
- what type of effects and colour manipulation was used and why?
I don’t think that there has been a huge amount of digital manipulation in the photo, although the contrast of the image could have been heightened. Also the overall shot could have been darkened to create a darker and more mysterious atmosphere.
Recreation:
For the final practical task of this week, we were to recreate one of the three shots we decided to analyse because of their effective use of lighting. I have decided to try to recreate the lighting from the shot below. This shot is from ‘The Addams Family’ (Barry Sonnenfeld, 1991) showing Morticia Addams. The lighting used when thinking about Morticia Adams has always been something that has intrigued me. She is often seen with a strip of light going across her eyes and slowly fading out. I feel that this use of lighting, as I stated when talking about this shot before, is extremely effective. Because of all of the reasons I stated before, I am really excited to complete this practical task.
Here is the image I will be basing my work on:
Silverman, R. (2014) ‘I based Morticia Addams on Jerry Hall, says Anjelica Huston’
Whilst completing this practical task, I did come across some problems that I will be discussing and evaluating, but I feel like I worked well with my crew to try to find reasonable and effective solutions to these problems, and carry on with the project in a fast and effective manner.
One of the first problems that I faced was picking the correct lighting setup to create the most effective shot representing the image I had chosen. At first, I simply had a key light setup. I decided to use barn doors to try to create the slit across my actors eyes. This was a good idea in theory, although the barn doors were not as effective as I had thought they could be. Here are some of the shots I took whilst using just a key light with barn doors:


As you can see by the images above, using simply a key light with barn doors was not a successful was to recreate the shot I had picked. I tried to find a solution to this problem by adding a fill light to fill in some of the shadows being created by the key light. Although this did help to light up my actor, It in fact made my actor too bright for the key light to have any visible impact, or in other words it didn’t look like the shot I was trying to recreate a all. Here is a shot I took to show that the fill light was too bright, and because of this the light being create by the key light was not being shown as much as how I would have liked :
 After some consideration, I decided the next step would be to use a diffuser on the fill light, to soften the light. This would compliment my actor more, and ensure that the key light had a stronger, hard light than the soft light of the fill light. I also tried the shot using both a black and a white background to see what I felt would compliment the shot more. Overall I decided that the white background complimented the shot more. I feel as though the Actors shadow adds to the mysterious and eerie atmosphere that I was trying to replicate.
The next problem that I encountered was the barn doors. Although the barn doors were helping to diffuse the light over the actors face, the light too soft, and diffused out too slowly for it to make a clear line around the actors eyes. here are two examples of this. The first shot using a black background, and the second using a white background:


At first, I found this problem hard to solve, but I then had two members of my crew use two pieces of board to block out even more of the light. I had them hold the two pieces of board just out of shot to reduce the diffusion of light over the Actors face.
Final Two Shots:
I ended up with two final shots. I think they both have their strengths and weaknesses, and so instead of picking one, I have decided to discuss, reflect and think about the strengths and weaknesses of each.
 I am extremely happy with how this shot turned out. I feel like I have recreated the shot I wanted to successfully. The strip across my Actors eyes turned out well, although I would have liked to make the light slightly smaller, as the harder light of the key light covers more of the face than I would have wanted. I also think that this shot is slightly bright than I would have wanted it. This is because the fill light was quite a strong light, and even using a diffuser will only make the light softer. Although, you can really see the features of the actor. I really like the fact that I managed the keep the actors shadow in the shot, I think that this really adds to the mysterious and eerie vibe surrounding the character of Morticia Addams. To conclude: I think that this shot is the most accurate representation of the image I chose to recreate, although I also really like the slightly more abstract approach that I took in the next shot.

In this shot I took a slightly different approach. Before I took the shot I reduced the exposure on the camera. I made this choice because I wanted to experiment with the exposure of the image, to see what would be the most successful. I am extremely happy with the light over the actors eyes. The level of diffusion is perfect and it really highlights all of details in her eyes. I really like how the fill light ensures that you can see the actor clearly, and that the really harsh shadows created by the key light are softened slightly. However, there is a harsh shadow on the right hand side that I am not happy with. I could crop this out however. This is what the shot looks like with the shadow cropped out:

As you can se the shot still looks extremely effective, and represents the image I was trying to recreate.
as an overall conclusion, out of the two final shots, the first shot is a more accurate representation of the image that I have chosen to recreate, but I personally prefer the more abstract and eerie approach that I took with the second shot.
Reflection:
Overall I have found this week extremely enjoyable. I am really really finding a strong interest in lighting, and how lighting can change the whole atmosphere of a scene. I would really like to think about this more in the future.
This week I have come a across a variety of different problems, I have learnt a lot by taking a moment to step back, and think about solutions to these problem. By doing this, I feel as though I am continuing to develop my skills as a creator. One example of this is when I was trying to recreate the my chosen shot: The barn doors that were helping to diffuse the light over the actors face diffused out too slowly for it to make a clear line around the actors eyes. At first, I found this problem hard to solve, but I then had two members of my crew use two pieces of board to block out even more of the light. I had them hold the two pieces of board just out of shot to reduce the diffusion of light over the Actors face.
Overall I have learnt a considerable amount this week, and I am really looking forward to developing my skills in lighting further in the future.
Feedback and peer reviews:
I have uploaded my recreation of the shot of Morticia Addams. I am extremely excited and happy with the large amount of feedback I have received on Instagram this week.
INSTAGRAM:


This week I am really overwhelmed by the large amount of feedback from this weeks post. I have received 30 likes on photo where I have shown what a have created in contrast to a shot similar to what I was trying to recreate. I have also received two comments. One individual expressed their liking for photo. Another was kind enough to inquire where I am based as he likes what I am posting. I am going to continue to interact and talk with Artur, as he is another budding Film Maker. It is really exciting to be able to make other contacts simply by sharing my work.
TWITTER:


This week on twitter I have received 2 like and 2 retweets. I tried using hashtags this week to see if this would help to widen the amount of people able to see my posts. Because of the 140 character limit, I put be selective, and think carefully about the hashtags that will get looked at most often. Next week I will try different hostages that relate to the was kI am focusing on, and see if this help me to gain more feedback.
Harvard Referencing:
Reddy, S. (2016) ‘Lighting Up “La La Land” | The Perfect Movie To Inspire You For 2017’ Available at: https://www.slrlounge.com/lighting-up-la-la-land-the-perfect-movie-to-inspire-you-for-2017/ (Last Accessed: 24th January 2017)
Silverman, R. (2014) ‘I based Morticia Addams on Jerry Hall, says Anjelica Huston’ Available at: http://www.telegraph.co.uk/culture/film/11234130/I-based-Morticia-Addams-on-Jerry-Hall-says-Anjelica-Huston.html (Last Accessed: 25th January 2017)

February 17, 2017 at 12:12 pm
Jenni – SUMMATIVE FEEDBACK – This is exemplar – would be marked at Distinction, but no Social Media comment Report. Please post asap.
LikeLike